利用GitHub Pages搭建Hexo静态博客教程
Written By Tomy Stark.
E-mail: ro7enkranz@qq.com
Ver 2.0.0Note:
- 转载请注明本文出处链接、作者
- 适配 Hexo 主题
Icarus 3.1.0
什么是 Hexo
Hexo 是一个快速、简洁且高效的博客框架。Hexo 使用 Markdown(或其他渲染引擎)解析文章,在几秒内,即可利用靓丽的主题生成静态网页。
搭建 Hexo 博客需要什么
- Visual Studio Code(用于作为 Markdown 编辑器,由于内部集成了终端,非常方便,必备!)
- Node.js(Node.js 版本需不低于 8.6,建议使用 Node.js 10.0 及以上版本)
- Git(用于将编译好的 Hexo 静态博客文件部署到 GitHub Pages)
- GitHub 帐号(帐号注册请自行完成,注册流程本文不做叙述)
详细步骤
1. 安装必要软件
-
下载完成后安装即可,没有特别需要注意的地方(
安装目录可自己手动指定)建议安装完成后,在 VS Code 中安装以下扩展插件:
- Chinese (Simplified) Language Pack for VS Code
- Markdown All in One
- Markdown Checkboxes
- Markdown Emoji
- Markdown yaml Preamble
- markdownlint
-
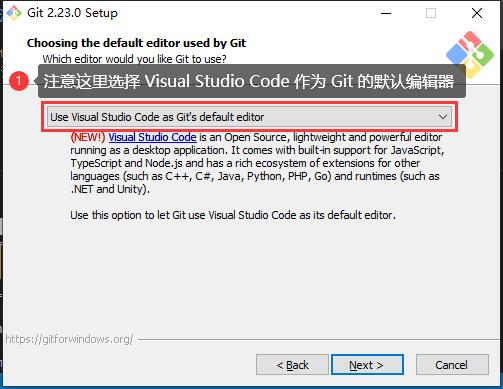
按照默认设置一直 Next 安装即可(
安装目录可自己手动指定) -
注意其中一步选择 VS Code 作为 Git 的默认编辑器,其它默认(
安装目录可自己手动指定)
2. 注册 GitHub 帐号
- 注册链接:GitHub 帐号注册(帐号注册请自行完成,注册流程本文不做叙述)
注意:请在注册完成后验证邮箱
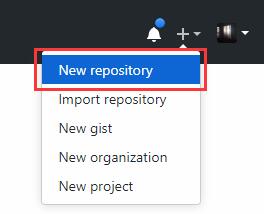
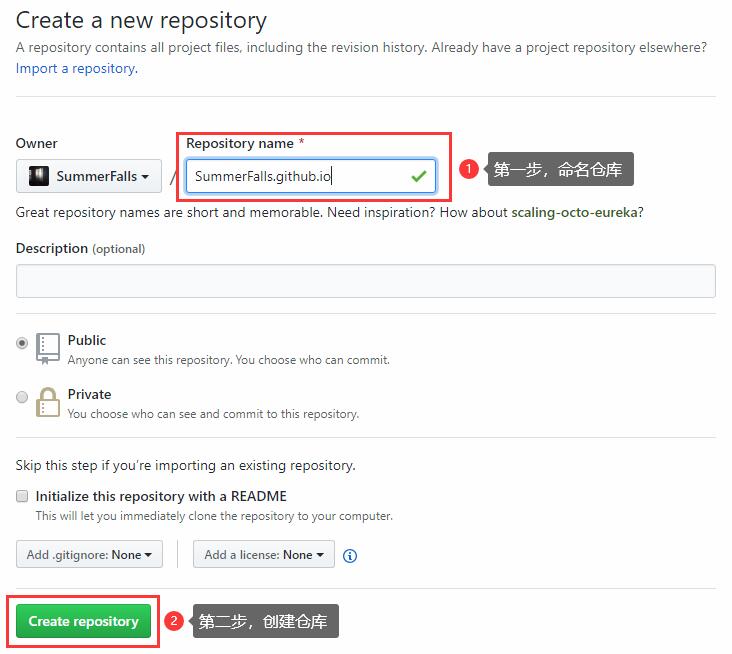
3. 在 GitHub 上新建仓库
- 登录账号后,页面右上角
+号,选择New repository
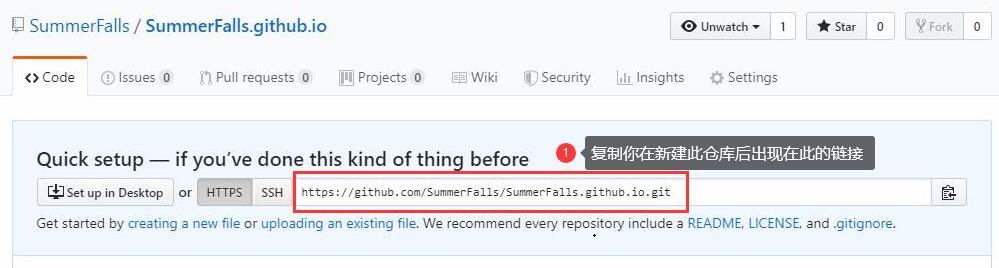
- 如果你希望你的站点能通过
<你的 GitHub 用户名>.github.io域名访问,你的 repository 应该直接命名为<你的 GitHub 用户名>.github.io。例如,我的用户名为SummerFalls,那么该仓库名就应该为SummerFalls.github.io,详见下图:
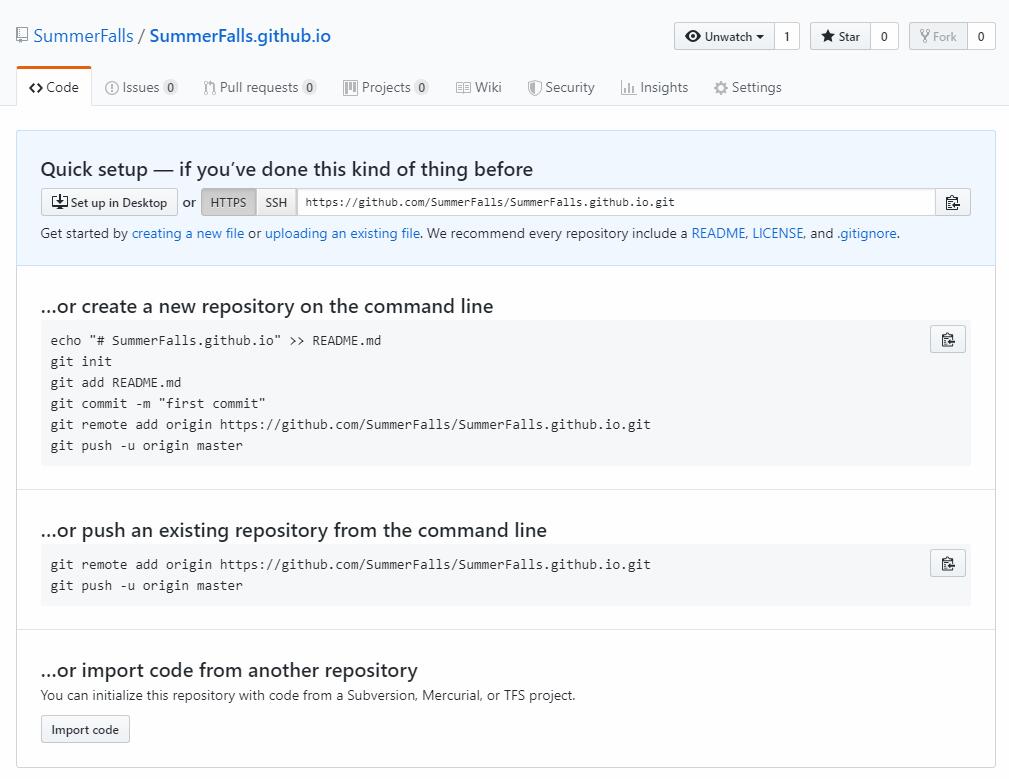
- 新建完成后出现如下图页面:
4. 安装 Hexo
- 打开
VS Code,按下 Ctrl + ` 打开内部集成的终端 - 先测试
Node.js是否被能够被VS Code的终端所调用- 在
VS Code的终端中输入命令npm -v- 如果正常,则会显示其版本号,例如
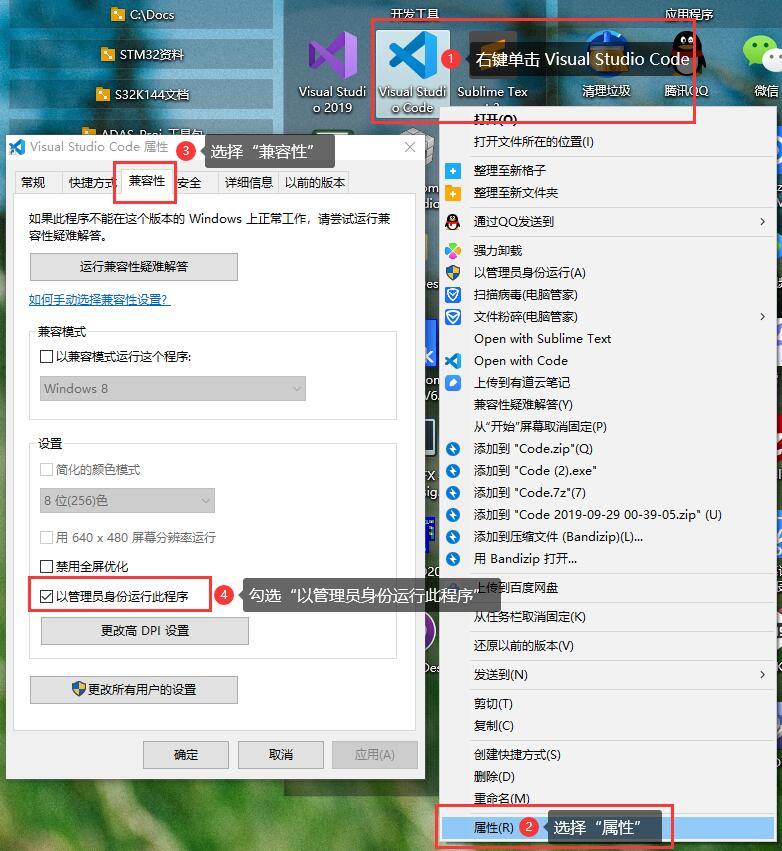
6.9.0 - 如果异常,则会提示类似错误:
npm : 无法将“npm”项识别为 cmdlet、函数、脚本文件或可运行程序的名称。请检查名称的拼写,如果包括路径,请确保路径正确, 然后再试一次。这时,请关闭VS Code,然后将其设置为以管理员身份运行此程序,之后重新运行VS Code,如图所示:
- 如果正常,则会显示其版本号,例如
- 在
- 定位到你想用于存放博客源文件夹的目录,我这里以C盘根目录为例
cd C:\
- 执行 npm 命令进行全局安装 Hexo
npm install hexo-cli -g
- 初始化 Hexo 博客(此举会在当前目录创建名为
blog的文件夹)hexo init blog
- 进入
blog文件夹cd blog
- 通过
blog目录下的package.json进一步安装依赖,之后会产生一个node_modules文件夹npm install
- 启动 Hexo 本地服务器
hexo s
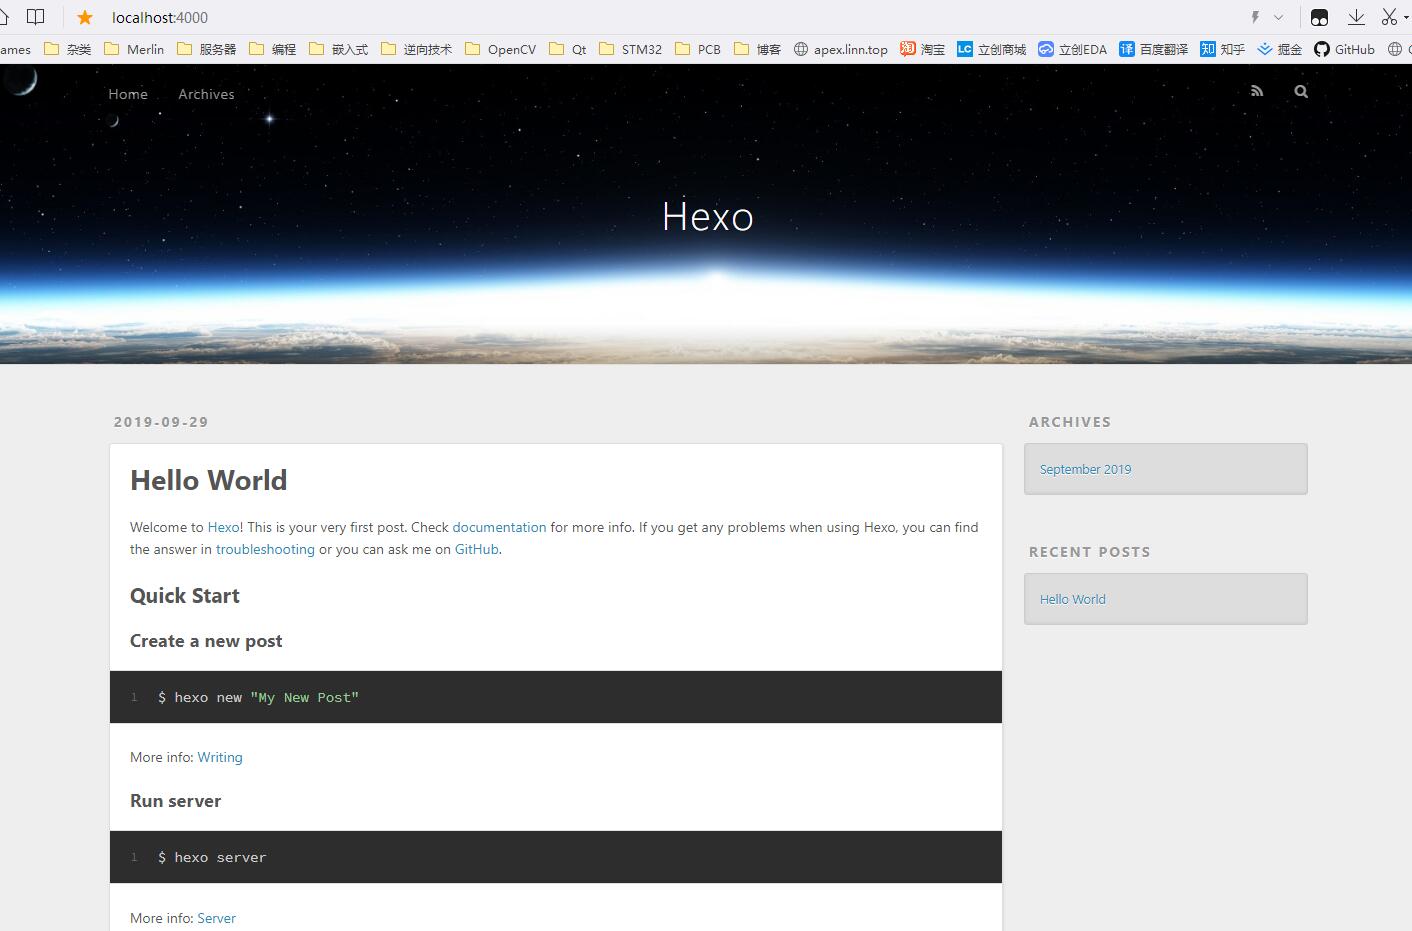
- 检查 Hexo 是否安装成功,在执行上面的命令之后,终端会返回如下信息,
按住 Ctrl + 鼠标左键单击该链接即可打开INFO Hexo is running at http://localhost:4000 . Press Ctrl+C to stop.
- 打开后的页面如图,即说明 Hexo 安装成功
- 回到
VS Code,切换到终端,按下Ctrl + C,之后输入Y以停止 Hexo 服务器
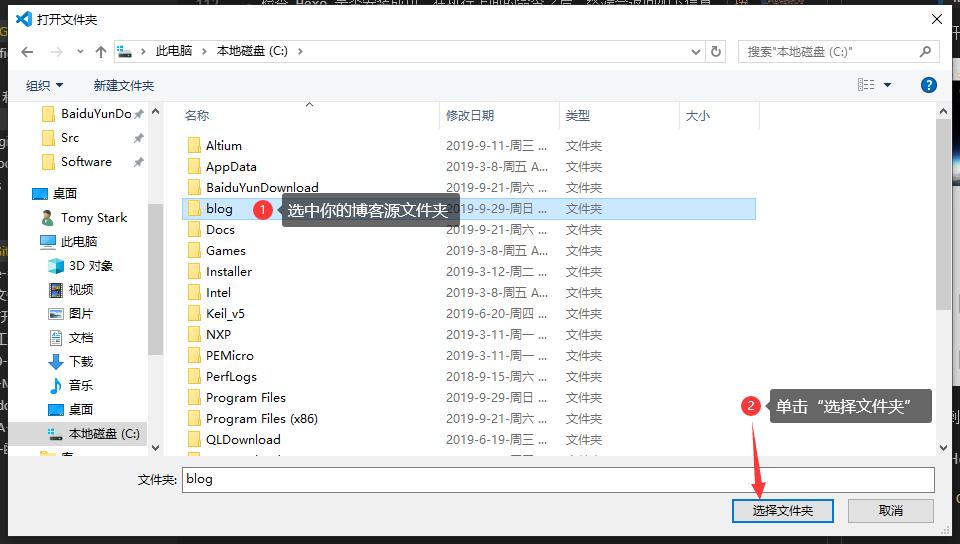
5. 配置 Hexo
VS Code中按下快捷键Ctrl + K + O,打开你的博客源文件夹,如图:
打开左侧
侧边栏中的_config.yml文件进行修改,如下所示,请认真阅读注释说明:_config.yml 1
2
3
4
5
6
7
8
9
10
11
12
13
14
15
16
17
18
19
20
21
22
23
24
25
26
27
28
29
30
31
32
33
34
35
36
37
38
39
40
41
42
43
44
45
46
47
48
49
50
51
52
53
54
55
56
57
58
59
60
61
62
63
64
65
66
67
68
69
70
71
72
73
74
75
76
77
78
79
80
81
82
83
84
85
86# Hexo Configuration
## Docs: https://hexo.io/docs/configuration.html
## Source: https://github.com/hexojs/hexo/
# Site
title: Tomy Stark's Blog # 你的博客名
subtitle: 四海茫茫 # 子标题
description: STM32, TI C2000, S32K # 博客描述,SEO相关
keywords: C, C++ # 关键词
author: Tomy # 博主名字
language: zh-CN # 语言,**关系到主题所显示的语言**
timezone: # 时区,默认留空
# URL
## If your site is put in a subdirectory, set url as 'http://yoursite.com/child' and root as '/child/'
url: 'https://SummerFalls.github.io' # 域名设置,如果没有自己的域名,则地址应为 https://<你的 GitHub 用户名>.github.io 例如我的为: https://SummerFalls.github.io
root: /
permalink: :year-:month-:day-:title.html # 建议将永久链接改成如此
permalink_defaults:
# Directory
source_dir: source
public_dir: public
tag_dir: tags
archive_dir: archives
category_dir: categories
code_dir: downloads/code
i18n_dir: :lang
skip_render:
# Writing
new_post_name: :title.md # File name of new posts
default_layout: post
titlecase: false # Transform title into titlecase
external_link: true # Open external links in new tab
filename_case: 0
render_drafts: false
post_asset_folder: false
relative_link: false
future: true
highlight:
enable: true
line_number: true
auto_detect: false
tab_replace:
# Home page setting
# path: Root path for your blogs index page. (default = '')
# per_page: Posts displayed per page. (0 = disable pagination)
# order_by: Posts order. (Order by date descending by default)
index_generator:
path: ''
per_page: 5 # 设置主页中每页显示几篇文章
order_by: -date
# Category & Tag
default_category: uncategorized
category_map:
tag_map:
# Date / Time format
## Hexo uses Moment.js to parse and display date
## You can customize the date format as defined in
## http://momentjs.com/docs/#/displaying/format/
date_format: YYYY-MM-DD
time_format: HH:mm:ss
# Pagination
## Set per_page to 0 to disable pagination
per_page: 10 # 设置归档(archives)页面每页显示文章数
pagination_dir: page
# Extensions
## Plugins: https://hexo.io/plugins/
## Themes: https://hexo.io/themes/
theme: landscape # 设置所用的主题,默认为 landscape
# Deployment
## Docs: https://hexo.io/docs/deployment.html
## repository 之后的链接应为你之前创建的仓库的链接,后面跟上 .git 后缀,如下图,可直接复制仓库链接
## 类型为 git
## 分支为 master
deploy:
type: git
repository: https://github.com/SummerFalls/SummerFalls.github.io.git
branch: master
6. 安装 Hexo 的必备扩展
- 安装热更新支持包
npm install hexo-browsersync –save
- 安装 Hexo Git 支持包,以支持部署 Hexo 博客到 GitHub
npm install hexo-deployer-git –save
- 安装网站地图生成支持包(根目录生成 sitemap.xml 方便搜索引擎抓取)
npm install hexo-generator-sitemap –save
7. 部署 Hexo 博客到 GitHub
生成 Hexo 静态博客网页文件
hexo g
部署 Hexo 博客到 GitHub
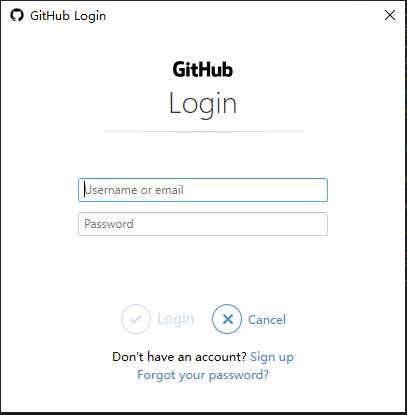
hexo d
- 第一次执行本命令会弹出登录框,请登录你的
GitHub 帐号如图所示:
- 第一次执行本命令会弹出登录框,请登录你的
- 稍等片刻,待终端命令执行结束后,浏览器打开你的博客网页地址,如图:
注意这一次网页地址为
_config.yml文件中url:字段后跟随的网页地址(实际上就是你的 GitHub Pages 仓库名),在这里,我的地址就应该为:https://SummerFalls.github.io

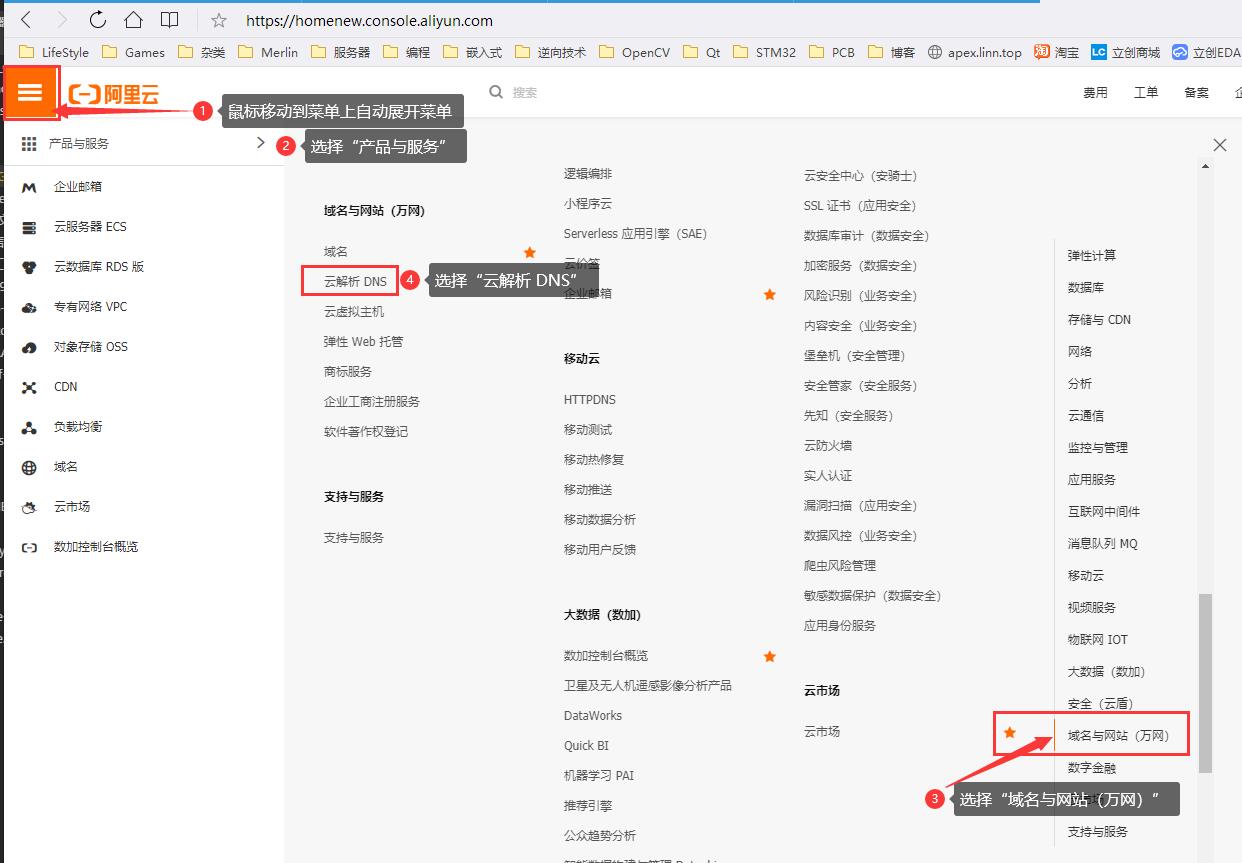
8. [可选] 设置 Hexo 博客域名解析
I. 设置域名解析
在设置自定义域名之前,请自行在域名服务商购买域名
这里以在阿里云购买的万网域名为例
- 打开并登录 阿里云
- 点击网页右上角的控制台
- 找到
云解析 DNS,如图所示:
- 点击自己购买的域名,进入
解析设置页面 - 点击
添加记录按钮,设置如图所示:- 记录类型:CNAME
- 主机记录:apex
这里你可以改为自己喜欢的名称
- 解析线路:默认
- 记录值:summerfalls.github.io
记录值改为你的 GitHub Pages 仓库名称
- TTL:10分钟
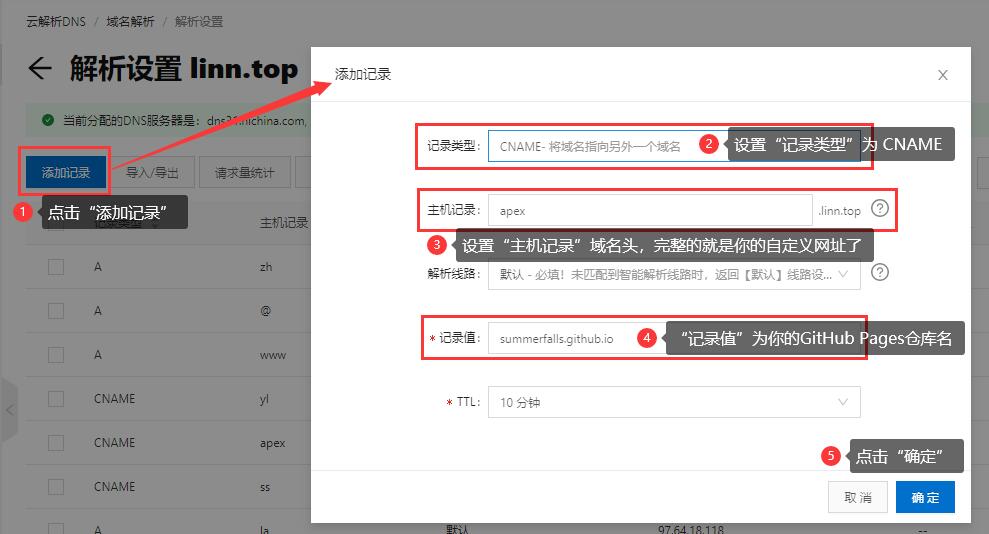
- 点击
确定,之后解析添加成功
II. 修改 博客根目录 下的 _config.yml 文件
1 | url: 'https://apex.linn.top' |
III. 用 VS Code 在 博客根目录 下的 source 目录下新建一个不带任何后缀名的 CNAME 文件
IV. 修改 CNAME 文件,文件内容为你的自定义博客网址
1 | apex.linn.top |
V. 重新生成并部署 Hexo 博客
hexo clean
hexo g
hexo d
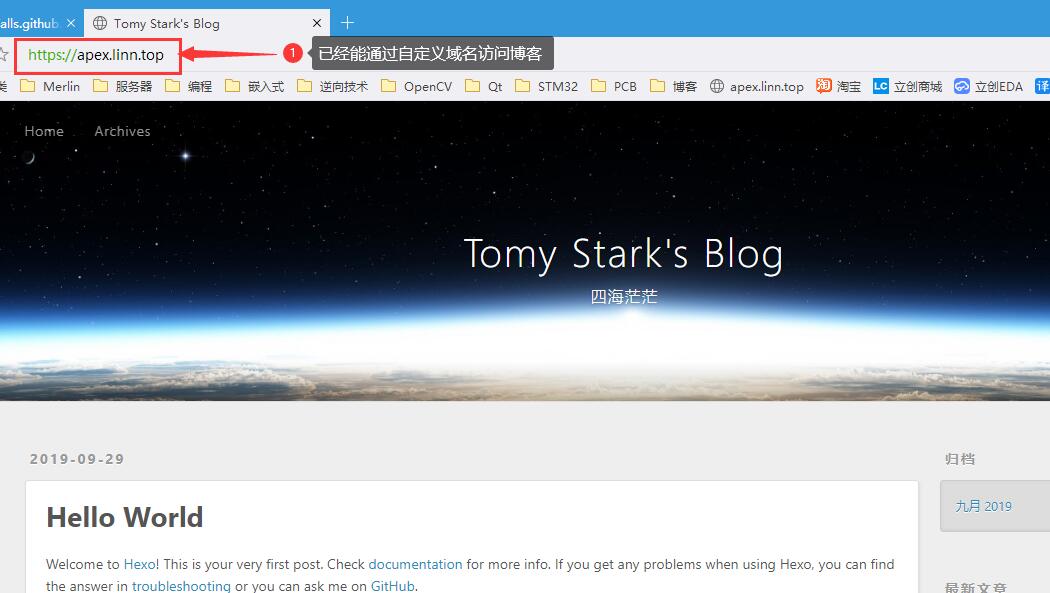
- 之后便能通过自定义域名访问博客,如图所示:
9. [可选] 更换 Hexo 博客主题
这里推荐
Icarus主题GitHub 地址:https://github.com/ppoffice/hexo-theme-icarus
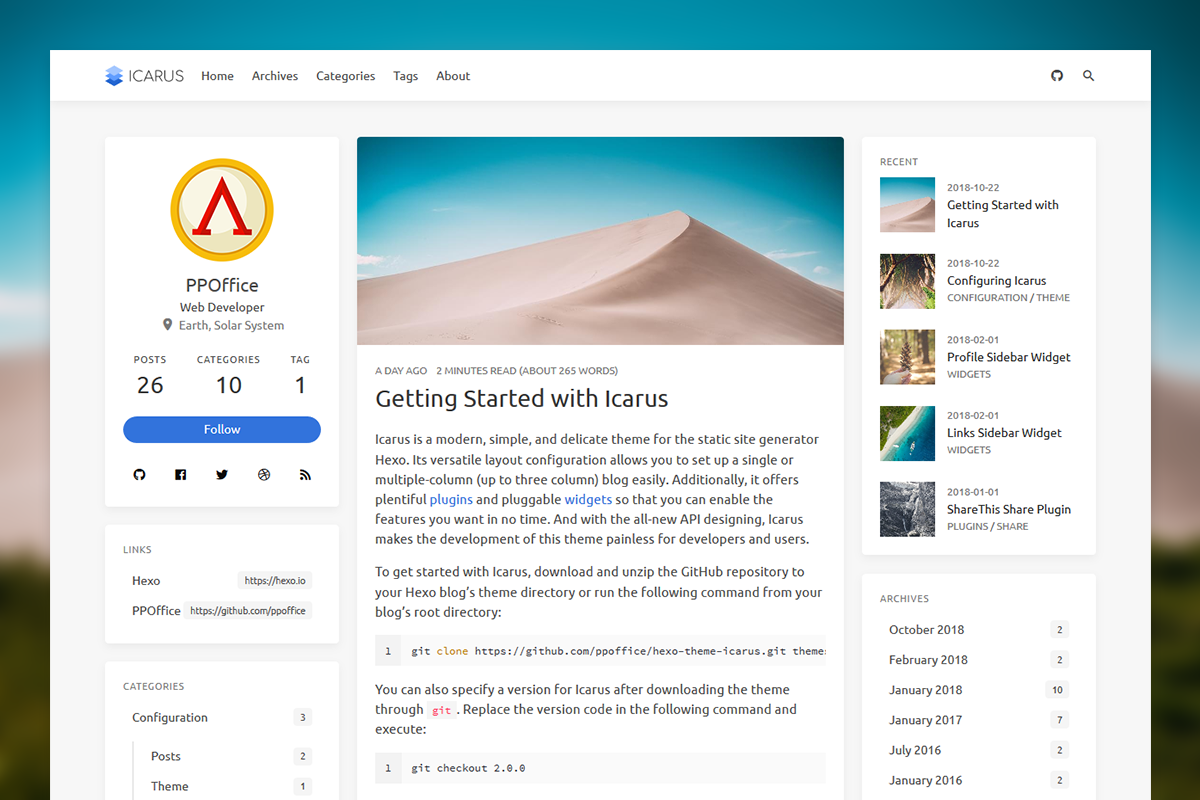
效果如图:
I. 更换步骤
在终端中,确保为
博客根目录的情况下,输入以下git命令,回车后等待安装完毕git clone https://github.com/ppoffice/hexo-theme-icarus.git themes/icarus
修改
博客根目录下的_config.yml文件_config.yml 1
theme: icarus
清理之后重新生成并部署 Hexo 博客
hexo clean
hexo g
hexo d
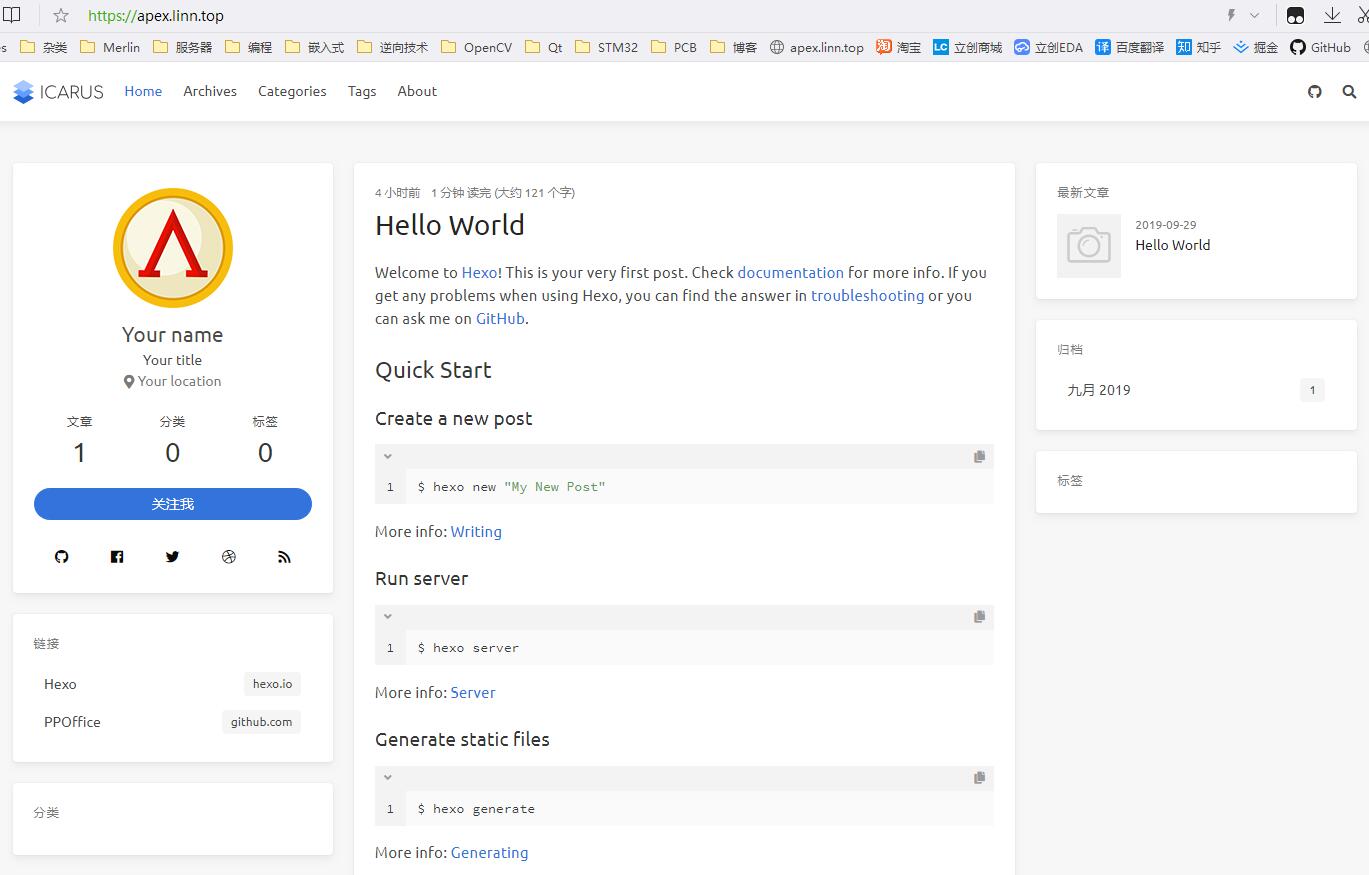
部署完毕后再刷新博客页面,发现主题更换成功,如图所示:
II. 修改主题的 _config.yml 文件
在
Icarus主题的根目录下,找到_config.yml文件,用VS Code修改注意:关于文章末尾的打赏,也在本文件设置,同时需要指定
支付宝和微信的收款码所处的地址,可以在source目录下新建一个images文件夹,在其中存放收款码图片,引用图片的方法如下所示:
1 | # Version of the configuration file |
- 清理之后重新生成并部署 Hexo 博客
hexo clean
hexo g
hexo d
III. 添加自定义 404 Not Found 页面
在终端中执行以下命令,创建一个
404的page页面hexo new page “404”
用
VS Code编辑\source\404\目录下的index.md文件其中字段
"thumbnail: "后的图片需要自行存放在对应目录并改为对应名称,后缀名称大小写敏感文件内容如下所示(可自定义添加更丰富的内容)
index.md 1
2
3
4
5
6
7
8
9
10
11
12
13---
title: 404 Not Found 该页面不存在
date: 2019-09-23 15:40:38
thumbnail: /images/IMG_6274.JPG
toc: false
permalink: /404
---
<div style = "text-align: center; margin: auto; width: 100%;">
## **很抱歉,您所访问的地址并不存在。**
</div>
清理之后重新生成并部署 Hexo 博客
hexo clean
hexo g
hexo d
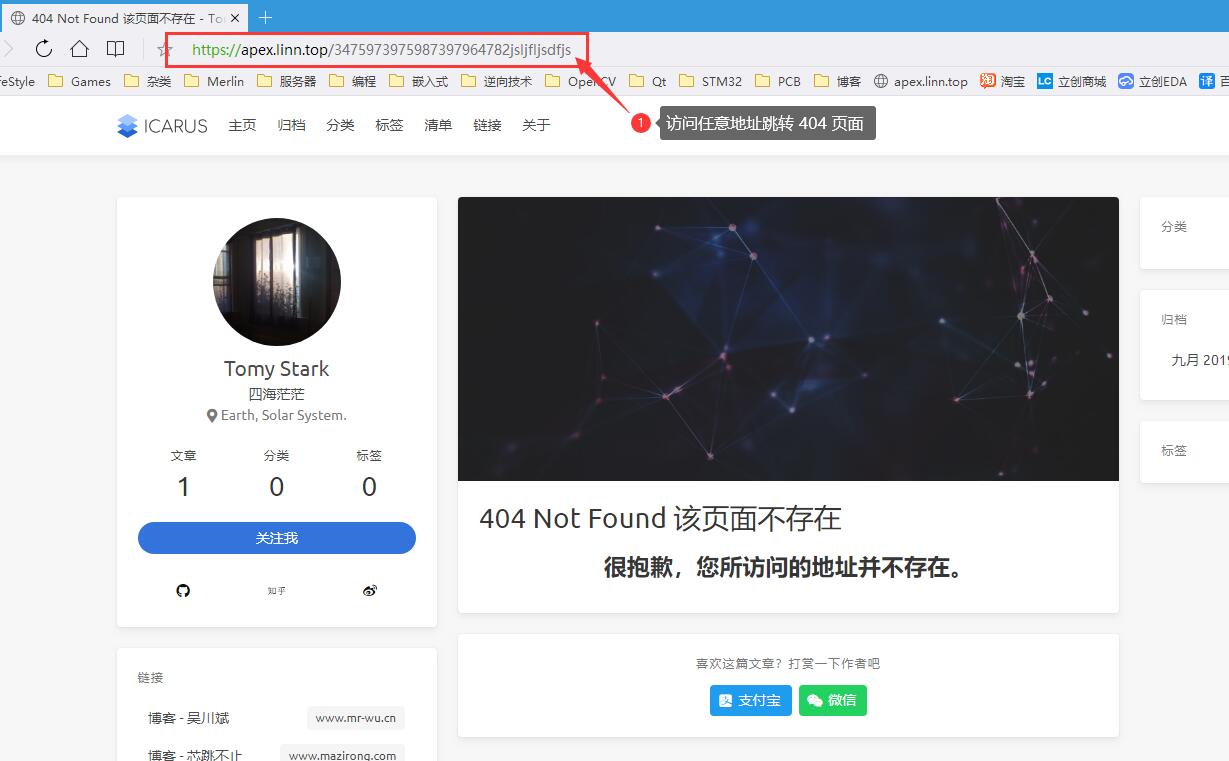
部署完毕后再次访问博客,地址后跟上不存在的文章,会自动跳转到刚刚自定义的 404 页面,如图:
IV. 添加关于页面
在终端中执行以下命令,创建一个
about的page页面hexo new page “about”
用
VS Code编辑\source\about\目录下的index.md文件其中字段
"thumbnail: "后的图片需要自行存放在对应目录并改为对应名称,后缀名称大小写敏感文件内容如下所示(可自定义添加更丰富的内容)
index.md 1
2
3
4
5
6
7
8
9
10
11
12
13
14
15
16
17
18
19---
title: 关于我 About Me
date: 2019-09-19 15:59:10
thumbnail: /images/Car.jpg
---
- <i class="fab fa-fort-awesome-alt"></i> 职业: 复制粘贴工程师
- <i class="fas fa-at"></i> 邮箱: xxxxx@qq.com
- <i class="fab fa-qq"></i> QQ: 123456789
- <i class="fab fa-weixin"></i> WeChat: XXXXXX
- <i class="fab fa-playstation"></i> PSN ID: XXXXXX
- 星座: 天蝎座
- 语言: C/C++/Java/HTML/CSS
- IDE: [VS Code](https://code.visualstudio.com/), [Vivado Design Suite HLx](https://china.xilinx.com/products/design-tools/vivado.html)
- EDA: [Altium Designer](https://www.altium.com.cn/), [EasyEDA](https://lceda.cn/)
- 兴趣: 开源硬件, 开源软件, HiFi, 美食, 音乐
- 游戏平台: <i class="fab fa-playstation"></i> Play Station 4, Nintendo Switch
- 运动: 游泳, 骑行
- 正在学习中的: Altium Designer, TouchGFX
清理之后重新生成并部署 Hexo 博客
hexo clean
hexo g
hexo d
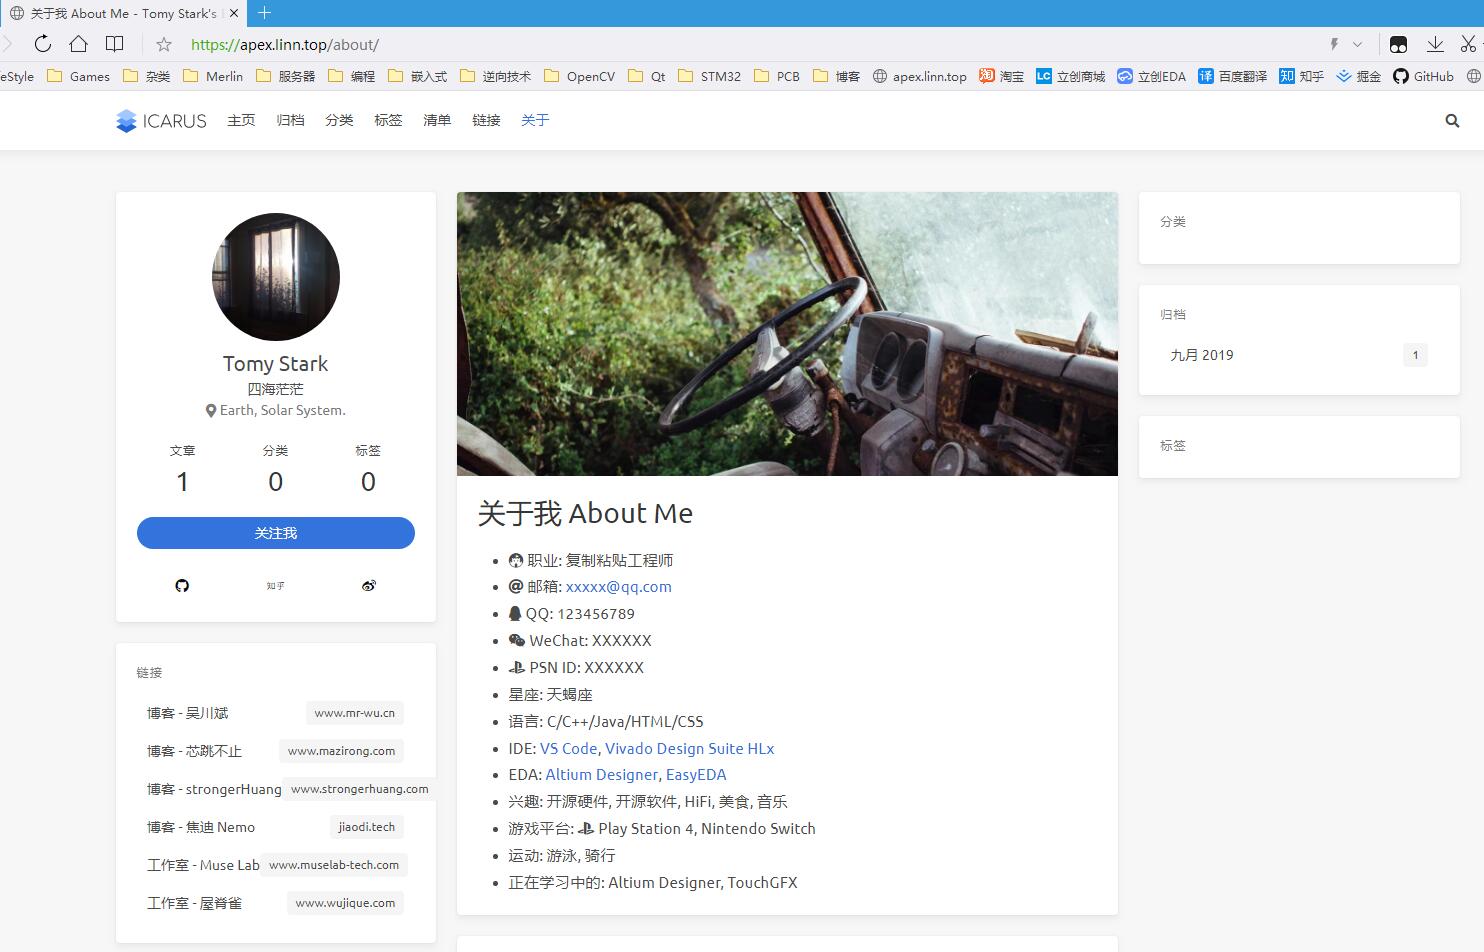
部署完毕后再次访问博客,
关于页面已经可以正常访问,如图:
V. Icarus 主题小问题修改
footer 页脚高度过高的问题
用
VS Code编辑主题目录下的default.css文件路径:
\public\css\default.css为文件中的
.footer类修改一行属性,如下所示:default.css 1
padding: 1.5rem 6rem;
修改属性后的
.footer类如下所示:default.css 1
2
3
4.footer {
background-color: #fff;
padding: 1.5rem 6rem;
}
10. Hexo 模板
\scaffolds目录下的 3 个文件分别为草稿模板、页面模板、文章模板,修改其内容以在每次新建文章或页面时,能够自动添加部分模板内容。
page.mdpage.md 1
2
3
4
5
6---
title: {{ title }}
date: {{ date }}
thumbnail: /images/flower.jpg
toc: false
---post.mdpost.md 1
2
3
4
5
6
7
8
9
10
11
12
13
14
15
16
17---
title: {{ title }}
date: {{ date }}
thumbnail: /images/flower.jpg
toc: true
categories:
- uncategorized
tags:
---
<!--more-->
<div style = "text-align: center; margin: auto; width: 100%;">

</div>
11. 写文章
注意:关于文章图片,若还没有创建
images文件夹,可以在source目录下新建一个images文件夹,在其中存放图片文件。这里以创建一篇标题名称为
Hello Hexo的文章为例:
在终端中执行以下命令,创建一篇文章
hexo new “Hello Hexo”
用
VS Code编辑\source\_posts目录下的Hello-Hexo.md文件其中字段
"thumbnail: "后的图片需要自行存放在对应目录并改为对应名称,后缀名称大小写敏感文件内容如下所示:
Hello-Hexo.md 1
2
3
4
5
6
7
8
9
10
11
12
13
14
15
16
17
18
19
20
21
22
23
24
25---
title: Hello-Hexo
date: 2019-09-19 15:59:10
thumbnail: /images/flower.jpg
toc: true
categories:
- Blog
- Hexo
tags:
- Hexo
---
## <i class="fab fa-fort-awesome-alt"></i> 你好 Hexo
正文...
<!--more-->
这里是在主页被隐藏的内容...
<div style = "text-align: center; margin: auto; width: 100%;">

</div>
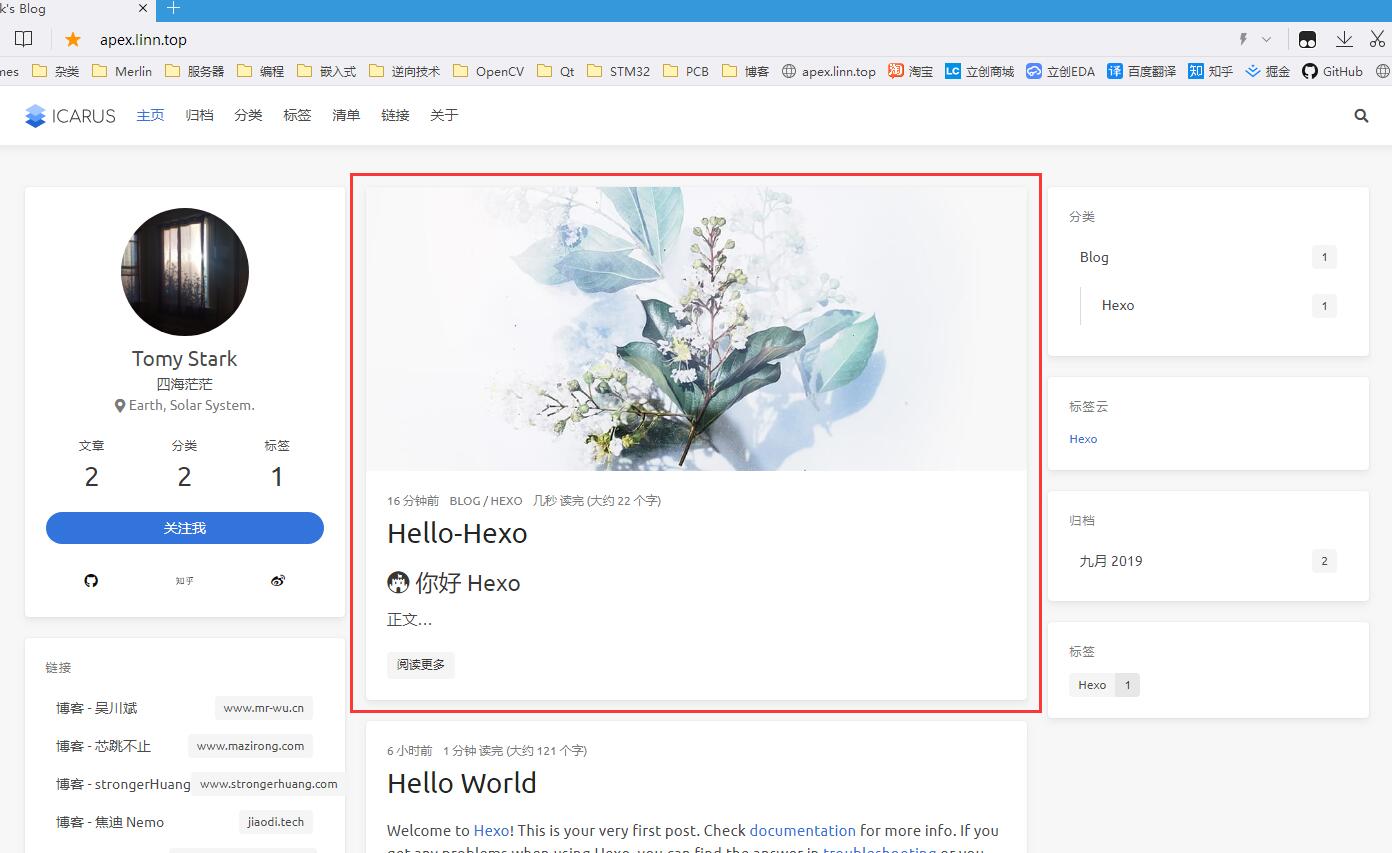
清理之后重新生成并部署 Hexo 博客
hexo clean
hexo g
hexo d
部署完毕后再次访问博客,刚刚发布的文章已经出现在主页上,如图: